Here is a step by step guide to building a loft conversion
- The first thing we need to do is to book an appointment at a time that is convenient to you for us to come round and see your loft.
- We will have to inspect the inside of your roof to ensure that it is suitable to be converted into a loft conversion. We will consider the access, the height of the roof and if there are any obstacles that will prevent us from building the conversion. Chimney stacks and water storage tanks can be a problem depending on where they are situated. In many cases they do not affect the project.
- We will need to call in a surveyor or an architect to confirm that your loft is suitable for a loft conversion. We will then have to decide whether your property will be able to handle the extra weight of a loft conversion. Plans will then be drawn up to your exact requirements.
- Once your loft conversion has been approved, your loft can be cleared. If you have a water tank in the loft, then it will have to be either moved to somewhere more ideal or removed completely if you have had a combi boiler fitted instead. Chimney stacks can be removed if necessary.
- If we find any electric wiring that is attached to the binders and joists, we will remove this and replace it with new wiring that will be rerouted to somewhere more ideal. It may mean that your electric will have to be turned off and you will be without it for a while.
- The next step will be to fit the new floor joists. We will decide on the size depending on the spans. A typical size would be 220mm x 50mm C16 or C24 timbers that will be spaced at 400mm intervals. If you have a door or a window opening below, it is necessary to bridge these up with doubled up timber that will need to be suspended between the joists. These will also need to be doubled up. Using joist hangers, the joists are fixed to the window bridge. All pipework and new wiring will then be installed.
- We use insulation to fill the spaces in between the joists. This will be to a depth of 100mm. Once this has been approved by building control, we will cover the floor joists with floorboards. We need to securely reinstall the hangers and roofing struts but this is only temporary. A more permanent replacement will be fitted at a later date.
- We will lay the floorboards and then screw these down to ensure they stay in place. If you are planning to have a bathroom in the loft, we would recommend a water resistant grade chipboard.
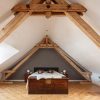
- Struts, collars and purlins can be removed safely once the structural requirements are put into place. This will then open up your loft.
- We will open up the roof as long as the weather is ok and it is not raining. The last thing we want is water damage. Any dormers will be installed into the roof. The roof will then need to be inspected. This is to ensure that the structure of the roof is reinforced as specified.
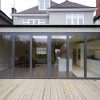
- One way of letting natural light into your loft conversion would be to have a roof window fitted. The surrounding timber needs to be reinforced on these types of windows. Dormers are a lot harder to fit than these windows but both look very effective.
- The staircase will be fitted making it easier to access the loft. The stair case will go down into the hall. In some case’s we may have to widen the hallway by knocking down a non-loadbearing wall and rebuilding it elsewhere.
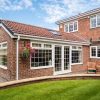
- If we have installed a shower room, then the dormer above it will have tile cladding and a felted flat roof. If you are planning to convert your loft into a bedroom, then the dormer will have tiles and cladding to ensure they are weatherproof. We will erect scaffolding up around your loft conversion, making it safe to work. Ridge and soffit vents will be fitted at a later time.
- We will then fit the windows into the dormers that were measured to the exact size. With any loft conversion, you will have a window fitted that will be used as a fire exit, if a fire was ever to occur.
- So your loft conversion is ventilated properly, we use insulation that will go in between the rafters, leaving an air gap (50mm) between the roofing felt and the insulation. We will then add more insulation over this making it 100mm. 300mm of mineral wool will be placed in the roof space. An inspection of the roof is required before we can cover the insulation and rafters.
- Any partition walls will be erected using 100mm x 47mm timber studs. Additional noggins will be needed. The space between the studs will be filled with a quilt. The plasterboard will then be attached.
- To secure radiators, switches and electric sockets, wall plates are fitted between the studs. The first lot of plumbing and electrics can then be installed.
- Any electrics that we install must comply to the building regulations (part P) along with the 17th Edition Electrical Regulations. If your old consumer unit has no extra capacity, we can install an additional one or a new one.
- It may be a good idea to add access panels at this time. We will connect central heating feeds and the water supply to your loft conversion.
- Plasterboard is attached and then a skim of plaster is applied to it to make your loft conversion ready to be decorated. Skirting and door frames are fixed to the walls and then painted.
- An extractor fan can be added if you have a bathroom or en-suite fitted into your loft conversion. We ensure that the walls of the shower room is covered with a cement based aqua board. Wall plated need to be fitted before this process.
- Any wall tile or floor tiles will be fitted in the shower room/en-suite. Any additional items can be fitted securely. Plumbing and electrics are then completed. Radiators are connected to the heating system once fitted into place. Any storage units can be built and fitted into place.
- Decorating can the commence leaving you with a lovely new loft conversion.